Handbell Manager (Version 2.0)
Copyright � Graham A C John 2009-2020
[email protected]
Handbell Manager enables up to four USB motion controllers to be
used as dummy handbells with change ringing simulators for Windows i.e. Abel,
Beltower, Ringing Room and Muster currently. Other simulators may be added in
future versions of Handbell Manager with the cooperation of their authors.
Licensing 
Handbell Manager is free software: you can redistribute it and/or
modify it under the terms of the GNU General Public Licence as published by the
Free Software Foundation, either version 3 of the Licence, or (at your option)
any later version.
Handbell Manager is distributed in the hope that it will be
useful, but WITHOUT ANY WARRANTY; without even the implied warranty of
MERCHANTABILITY or FITNESS FOR A PARTICULAR PURPOSE.� See the GNU General Public License for more
details at www.gnu.org/licenses.
For developers who may be interested, the C# source code for this
program is available from https://github.com/GACJ/handbellmanager.
The author would be pleased to receive feedback on Handbell
Manager, and will attempt to assist users with problems if advised by email.
Prerequisites
�
Abel (from www.abelsim.co.uk)
or Beltower (from www.beltower.co.uk).
Versions 3.7 and later of Abel and versions 10.27 and later of Beltower
included specific enhancements for use with Handbell Manager. Ringing Room (www.ringingroom.com) and Muster (drichards2.github.io/muster).
�
Microsoft Windows XP, Vista, 7, 10 (other
versions of Windows will also work if USB support and .Net Framework are
available)
�
Microsoft .Net Framework (from www.microsoft.co.uk)
�
One to four USB motion controllers. Handbell
Manager has been tested with the wired and wireless (�FriiHand�) motion
controllers manufactured by ActionXL (now no longer available). Other joystick
devices that generate a movement signal in an X, Y or Z axis will also work
with Handbell Manager. In 2020 a group of ringers developed eBells, which look
and feel like real handbells, but are 3D printed in plastic and contain USB
motion controller electronics (ebells.changeringing.co.uk).
�
Ringing Room requires Chrome or Firefox as the
browser (not Internet Explorer or Edge).
�
Muster requires that both the latest version
of Muster and either Abel or BelTower are installed.
Getting started
1.
Download and run HMInstall.exe from www.changeringing.co.uk/handbellmanager� to install Handbell Manager.
2.
Plug in your motion controllers.
3.
Run Handbell Manager.
4.
Press the buttons on the controllers. If
working correctly, the on-screen counts will update with an orange highlight to
show the stroke, and which buttons are being pressed.
5.
In Handbell Manager�s menu, click on Run � Choose Simulator and click on
your simulator software (either Abel,
Beltower or RingingRoom).
6.
Either
Run � Abel and
�
In Abel�s menu select Options � Ringing Options and check the option Bell Keys: up/down action.
�
If you have Abel version 3.6.2 or later,
uncheck the option Bell Keys: with Start.
�
Check that the bells sound if you press the
�J� and �F� buttons on the keyboard.
�
If you have an earlier version than Abel 3.9.2
then the Handbell Manager configuration settings will need updating as follows:
In Handbell Manager select Tools� � Options � Abel Settings, amend
ChildWindowClassName to �AfxMDIFrame80s� and GrandchildWindowClassName to
�AfxFrameOrView80s� and press OK to save the settings. Note: the Default
Settings button will revert these changes.
Or Run � Beltower and
�
Set the following options in Beltower�s Options � Ring Options:
o
Multi keys to �JF� for
two bells or �JFRU� for four bells and Ringers�
Bells to the bell numbers corresponding to those keys.
o
Timing
Options to Hand Bell Sensor(s)
with Animation
�
If you have an earlier version of Beltower
than 10.27, in Handbell Manager�s Options
� Beltower Settings, change Buttons
1 and 3 from ��� to �F5�
(Start).
�
Check that the bells sound if you press F5
then �J� and �F� buttons on the keyboard.
�
An option worth trying is Co-operative Timing, as following bells will hold up for you to
ring. To use it, you will also need to untick Auto-strike + Animate, tick Animate
on Input, Hand/Back Alternate,
and tick Flip Handbells in Animation Settings.
�
From Beltower version 11, there is a
new Timing Options preset called 'Hand Bell Sensors with Animation and
Co-opTim' to provide the ideal selections for Handbell Manager.� In addition, the spacebar can be used as an
alternative for Start/Stop, and any call key (BSOERT) can also be used
as a Go button.
Or Run � RingingRoom and
�
Handbell Manager will start a Ringing Room session
using your default browser, which needs to be Chrome or Firefox, not Internet
Explorer or Edge.
�
Assuming you are already registered with
Ringing Room, enter your Tower ID and name as usual. Click in the Ringingroom
window. If you have motion controllers set up, you should now find that moving
the motion controllers will cause Ringing Room to respond to your assigned
bell(s).
Or Run � Muster and
�
Handbell Manager will start Muster. If Abel or
Beltower is not already running, start it.
�
Click in the Muster window. If you have motion
controllers set up, you should now find that moving the motion controllers will
operate the bells in Abel or Beltower via Muster.
7.
Hold the ActionXL wired controllers like the
handles of handbells, with the buttons facing upwards underneath your thumbs
and the wires pointing towards your wrist, or turn on the ActionXL wireless
controllers and hold them in the palm of your hand with red light horizontal
and pointing forwards. Swing the controllers like handbells.
8.
If your controllers aren�t recognised or the
bells don�t ring, check out the troubleshooting section.
9.
If your bells ring, but not when you want them
to, check out the calibration section.
Command Line Options
These enable you to set up a desktop shortcut that is already set
for a particular use of Handbell Manager e.g. one shortcut for Handbell Manager
+ Abel and another for Handbell Manager + RingingRoom.
When you create a short-cut by right-clicking on
HandbellManager.exe (in your installation folder) and selecting "Send to
Desktop", a desktop shortcut is created. Now, you can modify the settings
of this shortcut as follows.
1.
Right-click the shortcut and select
"Properties".
2.
Click in the text box called
"Target:", then hit the "End" key. The cursor will move to
just past ".exe".
3.
Place a space character followed by the
following:
-s 0 -r���� To select Abel and automatically start Abel.
-s 1 -r���� To select Beltower and automatically start Beltower.
-s 3 -r���� To select RingingRoom and automatically
start a web-browser session. You will then need to enter the tower name or ID
into RingingRoom (unless you use a shortcut for that; see below)
��������������� -s 4 -r���� To
select Muster and automatically start the muster app.
Note: if you want to set the URL for
RingingRoom in the shortcut you can use -u <ringingroom URL>: e.g.
-s 3 -r -u www.ringingroom.com/mytower
(where "mytower" can be your tower name or an ID number)
For starting Muster via the shortcut,
the "Target" text would now look something like:
C:\HandbellManager140\HandbellManager.exe
-s 4 -r
4.
Click OK to close the Desktop Shortcut
properties dialog.
5.
Rename your shortcut if you like by
right-clicking and selecting "Rename".
Using Handbell Manager
If you plugged in your controllers prior to starting Handbell Manager, you should see a panel appear as shown below. If you plug in or remove your controllers after you started Handbell Manager, you will need to press the Check for Controllers button to find them. The handbells are shown right to left, to match the clockwise arrangement of the bells on your simulator�s display.
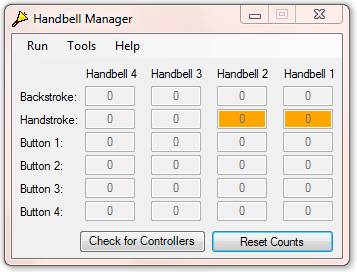
Handbell Manager counts each handstroke and backstroke and press of a controller button, and highlights in orange which stroke the bell is currently at. The button counts will also show in orange when they are pressed. These counts can help you determine whether the bells are configured properly. If you press the Reset Counts button to zero the counts, then swing a few handstrokes and backstrokes with each bell alternately, you should expect the counts to be equal to the number of strokes you rang.
If they appear to be functioning as expected, then it is worth trying them out with the simulator before changing any options. To start your simulator, you can click Run on Handbell Manager�s menu, or start it in the usual way.
This dialog window needs to remain open while you are using the dummy handbells, but you can move it or minimize it to hide it.
Handbell Manager has a number of tools to help you configure your dummy handbells for the best possible operation. These are described in the following sections.
Monitor
To help fine calibration of the controllers, Handbell Manager provides a Monitor (Tools � Monitor) which shows a graph of the handbell movement in real time. Each handbell is shown in a different colour. Two horizontal lines are drawn in the same colour as the respective handbell to show the point in the swing where the clapper strike is triggered. When the handbell�s position crosses these lines, Handbell Manager determines whether and when the bell will strike. For example, it will only strike a backstroke after a handstroke and visa versa. Also, it will not initiate another stroke within the debounce delay period. This prevents unwanted strokes being triggered while the controllers stabilise after a sudden stop, such as if you hit your hand on your knee. In addition, there is an option to introduce a strike delay for fine tuning of the handbell. When Handbell Manager actually issues the keystroke to Abel to strike the bell, a vertical line is drawn on the monitor showing the timing of the clapper strike.
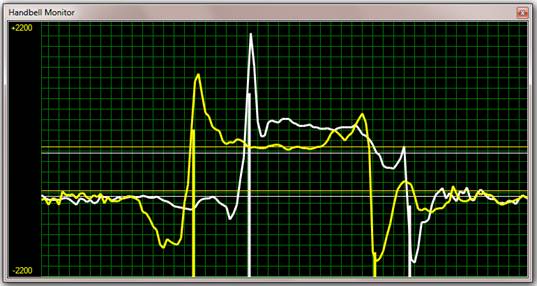
The monitor can be frozen and unfrozen by pressing the F3 Key, or by right clicking and selecting Freeze from the context menu. Options are also available on this menu to turn any of the monitor lines on or off.
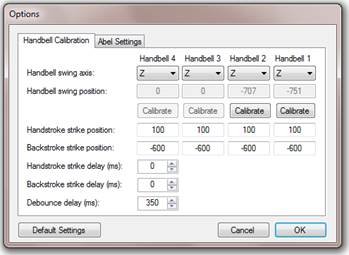
Calibration
Most users should find the default calibration satisfactory for ActionXL wired controllers, since it has been chosen to reflect the dynamics of the clappers of real handbells, and normal handbell usage. Try the controllers with the default settings for a while before attempting any changes to reflect your own ringing style.
If changes are required
because the bells don't sound at the right times for your style, select Tools � Options from the menu to show
the settings dialog. The first tab contains the handbell calibration options.
If the backstroke sounds too
early/late then make the backstroke calibration value more/less negative, by
manually typing in the Backstroke strike
position box below each bell.� If the
handstroke sounds too early/late then increase/reduce the Handstroke strike position in the same way.� Any changes made to values will be effective
immediately so you can try the bells and continue fine tuning.
Once you are happy with the settings, click on OK to permanently save them, or Cancel to revert to earlier settings. If you wish to revert to Handbell Manager defaults for all options (Handbell Calibration and Abel/Beltower Settings), press the Default Settings button.
More on Calibration and Fine Tuning
If you wish to calibrate your controllers, select Tools � Options from the menu to show the settings dialog. The first tab contains the handbell calibration options. The screen shows the current axis (tilt position) of each controller as values between -2048 and 2047. Negative values occur when the buttons are on the upper side of the controller and positive ones when the buttons are on the lower side, and are zero when the controller points either upwards or downwards.
The ActionXL motion controllers use tri-axis accelerometers to determine their position and are factory calibrated to 2g. Handbell Manager is only using one axis to determine the up down swing of a handbell. When you tilt the controller to its upper or lower extreme, it has only moved half as far as it can (because the Earth's gravitational pull is 1g, half of the maximum). In motion higher Z-values will be recorded, particularly on the downswing where the acceleration is in addition to the pull of gravity.
An option to change the Handbell swing axis has been included for experimentation with different controllers, or more unusual handbell swing actions. In the case of the ActionXL controllers, the Z-axis is up/down, the X-axis is left/right, and the Y-axis is back/forward. The remainder of this section assumes that you are using the default i.e. the Z-axis.
For dummy handbells to function reliably, the strike positions need to be set close enough together to ensure that the controller will trigger them even if they are swung very gently i.e. they must be within the range of the resting positions at handstroke and backstroke. The strike positions can be close together towards the middle of the swing, but the backstroke Z-axis position must be a lower value than the handstroke position, unless you wish to use the controllers upside down, in which case the handstroke will be the lower value. Handbell Manager uses this difference to distinguish handstroke from backstroke.
Each bell has a Calibrate button that helps you capture a backstroke and handstroke strike position by holding the controller in the position you want and pressing a button. Note that you can hold the controllers either way up (e.g. buttons facing down, if this is more comfortable) but you must calibrate them as you intend to use them as the Z-axis position for handstroke and backstroke would be reversed, and will have a different sign and size.
When using the Calibrate
buttons, the controllers must be held completely still when the button is pressed,
because any movement or jolting will result in incorrect calibration. Also, do
not calibrate the controller with it held below a horizontal position (This is
because the controller interprets angles below the horizontal identically to
those above the horizontal.)
As an alternative to using the Calibrate buttons you can manually type in the Z-axis position in the Handstroke and Backstroke strike position boxes below each bell. You may find it easier to start with the default values as shown above, then manually fine tune the values up or down in increments of ten until your bells strike at the desired position. You can have the monitor window open while you are making these changes to show visually what effect the changes are having.
If the bells are striking too late, you need to adjust the strike positions to be closer to one another (i.e. earlier in the swing), by making small adjustments to the numeric strike value, or by pressing the Calibrate button to set new values. Also ensure that the Handstroke strike delay and Backstroke strike delay are set to zero. Changes are effective immediately, so you can keep ringing the bell to see whether you are getting the desired result.
If the bells are striking too early then there are two options. First try adjusting the strike value. If the bells are still striking too early, you can then introduce a Handstroke strike delay or Backstroke strike delay by setting an appropriate value in milliseconds. Note that the same delay will be applied to all bells.
Handbell Manager will not strike the same bell twice before the Debounce delay period has passed. This prevents multiple strokes occurring in quick succession when the controller signal bounces after a sudden stop. Experience has shown that 350ms is a good value to cure this problem, while still allowing you to ring the bell twice in a second.
Simulator Settings
The settings for controlling your simulator software can be configured using the Tools � Options � Abel Settings, Beltower Settings, RingingRoom or Muster Settings tab; the relevant simulator having already been selected from the Run menu. Handbell Manager works by sending messages to the simulator as though you had pressed the keys on the keyboard. The keys to be pressed by Handbell Manager can be changed here.
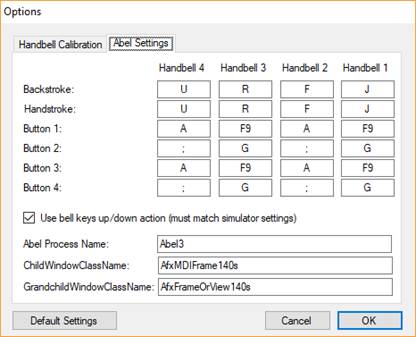
The key for ringing each of four bells is initially set to the default used in Abel (J, F, R & U). Beltower can be configured to use the same keys. However, if the keyboard mappings have been changed in your simulator, they have to be changed in Handbell Manager to match.
The buttons on each controller can also be configured to trigger simulator functions, such as Start, Go, Rounds, Stand, Pause, Bob, Single etc. As well as individual keys, you can also type �F1� to �F12�, �Esc� or �End� to operate the function keys.
eBells and the ActionXL wired controller have a Left (1) and Right (2) Button. The ActionXL �FriiHand� wireless controller additionally has an Upper (3) and Lower (4) button on the nose of the controller. Handbell Manager button defaults are:
|
Simulator |
Abel |
Beltower |
||
|
Handbell |
1 & 3 (Right hand) |
2 & 4 (Left hand) |
1 & 3 (Right hand) |
2 & 4 (Left hand) |
|
Left button (1): |
Start/Stop
(F9) |
Bob
(A) |
Start/Stop
(�) |
Bob
(B) |
|
Right button (2): |
Go
(G) |
Single
(;) |
Go
(G) |
Single
(S) |
|
Upper button (3): |
Start/Stop
(F9) |
Bob
(A) |
Start/Stop
(�) |
Bob
(B) |
|
Lower button (4): |
Go
(G) |
Single
(;) |
Go
(G) |
Single
(S) |
To prevent your dummy handbells and simulator getting out of sync (e.g. you bell is at handstroke and the simulator is displaying the bell at backstroke), you can use the up/down keyboard action in Abel. With this option, Abel and Handbell Manager cannot get out of sync as a keyup is used for a handstroke and a keydown for a backstroke. The Use bell keys up/down action must be ticked both in Handbell Manager and in Abel (under Abel�s Options � Ringing Options) for this to work. Conversely, both should be unchecked to use normal keystrokes.
The Process Name is the executable name for the version of Abel or Beltower you are using e.g. Abel3 or Beltow95. It is the name of the executable file without �.exe�. This is also the name of the shortcut to Abel you should place in Handbell Manager�s installation folder (�C:\Program Files\Handbell Manager� is the default location) to allow it to be started from Handbell Manager�s menu. You may need to be logged on as an administrator to access Program Files folders.
The ChildWindowClassName and GrandchildWindowClassName are required so that Handbell Manager can pass keystrokes to the correct window in the respective applications. Default values are provided, but these may need to be amended for different versions of the simulator software. For example, these values changed from �AfxMDIFrame80s� and �AfxFrameOrView80s� to �AfxMDIFrame140s� and �AfxFrameOrView140s� respectively in Abel version 3.9.2.
Reassigning Controllers
Handbell Manager cannot identify controllers uniquely and stores the configuration settings by handbell number. If on subsequent use, controllers with different configuration characteristics are identified in a different order by Windows, the controllers may not be assigned to the same handbell. To overcome this problem, choose Options � Assign Controllers from the menu.
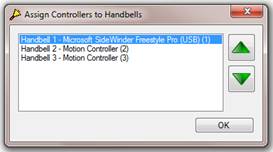
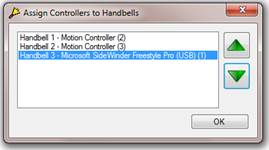
In the example above, another joystick is connected and was automatically assigned to Handbell 1. By clicking on this controller to highlight it, and clicking the green down arrow twice, it can be reassigned to handbell 3, or not to a handbell at all had four other controllers had been active. The two motion controllers appear identical, but could have different calibration settings. These could be swapped by clicking on the second one and clicking on the green up arrow to move it up the list.
Troubleshooting
Some possible reasons for problems are listed below to help with troubleshooting.
Cannot run Abel, Beltower or
Muster from Handbell Manager
�
Shortcut not present or its name doesn�t match the process name in
Abel/Beltower Settings. Create a new shortcut to the Abel/Beltower executable
and copy it into Handbell Manager�s installation folder. Rename it to the
Abel/Beltower Process Name (e.g. �Abel3� in place of �shortcut to Abel3.exe�).
�
Shortcut not setup correctly to run Abel/Beltower. Confirm that it
works if you double-click it.
No Motion Controllers Found
� Only Windows recognised motion controllers are fully supported.
� eBells and ActionXL controllers are plug and play devices, so installation is automatic. Windows should recognise them as a game controller. If they are being recognised as a generic joystick or are not being recognised at all, then there is a configuration problem in Windows.
� https://gamepad-tester.com is a useful website to confirm that your controllers have been identified appropriately.
Bells do not ring
�
The appropriate simulator is not running. Check that the bells ring
when the simulator is used with the keyboard.
�
For RingingRoom, its browser window must be kept in focus.
�
More than one copy of the simulator is running. Close all but one
instance.
�
Handbell Manager is not running.
�
The wrong simulator is chosen in Handbell Manager. Reselect using Run � Choose Simulator.
�
The Process Name in Handbell Manager Tools - Options - Abel Settings or Beltower Settings is not the
same as the instance of Abel/Beltower that is running, or the ChildWindowClassName
and GrandchildWindowClassName are not correct for the simulator�s version.
�
The keyboard mappings for the bells in Handbell Manager don�t match the
simulator�s keyboard mappings.
� The option Use bell keys up/down action setting is not the same in both Handbell Manager and the simulator.
�
The backstroke and handstroke strike positions
are set too high or too low.
�
The wrong Handbell swing axis is being used
(should be �Z� for ActionXL controllers).
�
The controllers are not assigned to the correct
handbell. Use Tools
- Options � Assign Controllers to change.
�
Wireless controllers are not switched on, are not communicating with
the correct dongles, or the batteries are flat. Remove a battery to fully
reset.
Buttons do not work
�
The keyboard mappings for the buttons in Handbell Manager don�t match
the simulator�s keyboard mappings or Function Keys.
�
Wireless controllers are not switched on, are not communicating with
the correct dongles, or the batteries are flat. Remove a battery to fully
reset.
Bells strike too late
�
Backstroke and/or handstroke strike delay are not set to a low enough
value. Set to zero.
�
Strike position is set too late in the swing. Fine tune by making small
adjustments to the strike values.
�
Incorrect calibration. If using the Calibrate button, hold the
controller absolutely horizontal for the backstroke strike and absolutely
vertical for the handstroke strike, then make fine adjustments manually to the
strike values.�
Bells strike too early
�
Strike position is set too early in the swing. Fine tune by making
small adjustments to the strike values.
�
Incorrect calibration. If using the Calibrate button, hold the
controller absolutely horizontal for the backstroke strike and absolutely
vertical for the handstroke strike, then make fine adjustments manually to the
strike values. If the bells still strike too early, use the backstroke and/or
handstroke strike delay.
Bells strike erratically or
multiple times
�
Debounce delay too small. Set the debounce delay to a value that
eliminates multiple strikes (e.g. 350ms).
�
Backstroke and handstroke strike positions are too close to one
another. Recalibrate.
�
Controllers are upside down, and have not been calibrated for upside
down use.
�
Inconsistent handbell swing. Swing the controller so that
the arc it makes is in the vertical plane that is in line with the wire, and
the upper flat side (with the buttons) is always approximately perpendicular to
the vertical plane.� Although other
motions of the controllers can make the bell sound, the calibration may not be
correct.
�
More than one copy of a simulator is running. Close all but one
instance.
Simulator pictures are at the
opposite stroke to the controller
� Hold the handbells at handstroke and press F4 to reset Abel bells. This problem can be eliminated if the Use bell keys up/down action is checked both in Abel and Handbell Manager. Warning: Although you can get the handstrokes and backstrokes back in phase by turning the dummy handbells over, this disrupts the calibration and the striking points will be incorrect.
�
For Abel or Beltower, type �J� or �F� on the
keyboard to switch the stroke of the bell independently of the controller.
Bell is ringing but Abel
images are not rotating
�
Hold the handbells at handstroke and press F4 to reset Abel bells.
Error message displayed when
Handbell Manager opens or saves settings
� Settings file corrupt, or an incorrect version. Delete it and it will be automatically recreated with the default settings.
�
Incorrect file access permissions. Handbell
Manager is designed to work under Windows with standard user access
permissions. Check that you have read access to the installation folder and
write access to the user�s application data folder.
Motion controllers don�t feel
like handbells
�
The motion controllers are too small and light. Try attaching the
controllers to pieces of wood, or to the handles of handbells with the clappers
removed.
�
The ActionXL wireless controllers are larger and heavier than the wired
controllers.
�
eBells are designed to look and feel like real handbells
Handbell Manager crashes with
an error message
� If it occurs more than once, report it to the author.
Handbell Manager Version History
Version 0.1
� First test release.
Version 0.2
� Abel can be run from the menu.
� Menu Help loads this readme file.
� Menu icons added.
� Email link added in About box.
� Consistent background colour for Count textboxes.
Version 0.2.1
� Extra information in help file
Version 0.2.2
� Calibration defaults improved
Version 0.3
� Dialogs reorganised.
� Handbells reversed in Handbell Manager windows to correspond to your left and right hand and the clockwise arrangement in Abel.
� Calibration method changed to set strike points directly, removing references to resting position.
� Strike values can be adjusted manually.
� Handstroke and Backstroke delay period added.
� Monitor added to display handbell motion in real time.
� Abel interface changed, and will work even if Abel is not the foreground window.
� Abel�s Up/Down Key interface support added.
� Buttons can be configured for Esc and F1-12 keys.
� Button added to reset options to default values.
Version 0.3.1
�
Problem running on 64-bit windows operating systems resolved.
Version 0.4
�
Can check or uncheck handbell lines, striking points or calibration
lines for all bells simultaneously.
�
Handstroke strike positions moved above backstroke strike positions in
the Options dialog.
�
Number editing improved in the Options dialog.
�
Strike position defaults changed to -600/100.
�
Use Abel bell keys up/down option default changed to Checked.
�
Confirmation message box is shown if Default Settings button is
pressed.
�
Bells no longer sound immediately after controller initialisation.
�
Another Abel process instance is automatically discovered after the
first one is closed.
�
Installer/uninstaller provided.
Version 1.0
�
First official release.
�
Installer optionally creates startup shortcuts for all users.
�
Installer optionally creates desktop shortcuts for all users.
�
The settings file is now user specific and is located in the user�s
application data folder.
Version 1.1
�
Any joystick will be identified by Handbell Manager, not just those
labelled Motion Controllers.
�
An Assign Controllers option has been added to allow controllers to be
reassigned to different handbells.
�
The controller Swing Axis can now be specified and saved for each
handbell.
�
Support has been added for four button controllers (such as the
wireless ActionXL �FriiHand� controller).
Version 1.2
�
Support for Beltower added, and the option to choose which simulator to
use. Each simulator has its own set of configurable options.
�
Process Name is now case insensitive.
�
A new settings file is created when its format is changed by a new
version of Handbell Manager. Previously set options are carried forward.
Version 1.2.1
�
The problem introduced in Version 1.2 whereby Settings were not being
restored or saved correctly after the Options dialog was cancelled is now
resolved.
�
The Options dialog will remember which tab was previously on top when
it is re-entered.��
Version 1.2.2
�
Input fields added to Options Settings to allow the
ChildWindowClassName and GrandchildWindowClassName to be modified, following
the release of Abel v3.9.2. The default values for these fields are now set for
Abel v3.9.2.
Version 1.2.3
�
Options Settings for ChildWindowClassName and GrandchildWindowClassName
can now be modified and saved, in the previous version changes to these two
fields were not being accepted.����
Version 1.3
�
Ringing Room added as a Simulator.
�
Command line options added.
Version 1.4
�
Muster added as a Simulator.
Version 2.0
�
Gyro support added for eBells.
�
Calibration works for any selected axis.
�
Formal installation release including Ringing Room, Muster and eBell
support.
Acknowledgements
I would like to thank Chris Hughes, Simon Humphrey and Richard Johnston for their assistance in design, testing and documentation for Handbell Manager and Derek Ballard for his assistance with Beltower. I would also like to thank Jay O�Leary of ActionXL for his interest in and support for the Handbell Manager project.
The Ringing Room modifications were developed by Adrian Nash, Mike Pidd and Richard Johnston.